Process

Get Behind the Scenes With My Instagram Stories

Do you follow me on Instagram? Yes? Hooray, thank you! I hope you enjoy my posts there. I like posting in-progress shots of my work, pictures of me at conventions, and pics with my art buddies.

BUT.

There's more that you might be missing!

Instagram has a cool feature I've been playing with called "Stories." Much like the famed Snapchat, Stories lets me build a little fun narrative. They're usually snapshots or tiny videos of what I get up to throughout the day that give you an extra special behind-the-scenes peek.

You can get quality humor like this!

You can get quality humor like this!

And amusing, melting self portraits like this!

And amusing, melting self portraits like this!

And don't forget great snaps of my Studio Assistant!

And don't forget great snaps of my Studio Assistant!

Bits and bobs about my process as I go...

Bits and bobs about my process as I go...

... and weird closeups of the tips of my markers!

... and weird closeups of the tips of my markers!

These stories constantly update throughout the day as I add to it, so you can see what weird art-related (and sometimes totally personal) shenanigans I get up to! Some days I post more than others, and I'm sure some days I won't post at all. These stories also disappear after 24 hours, so it's always immediate "right now" content... and you might be missing stuff if you don't check in daily (that's the scheme, see? Good thinking Instagram. I don't even want to talk about how much of my day I spend watching others' stories...)

Here's how to see 'em!

Here's how to see 'em!

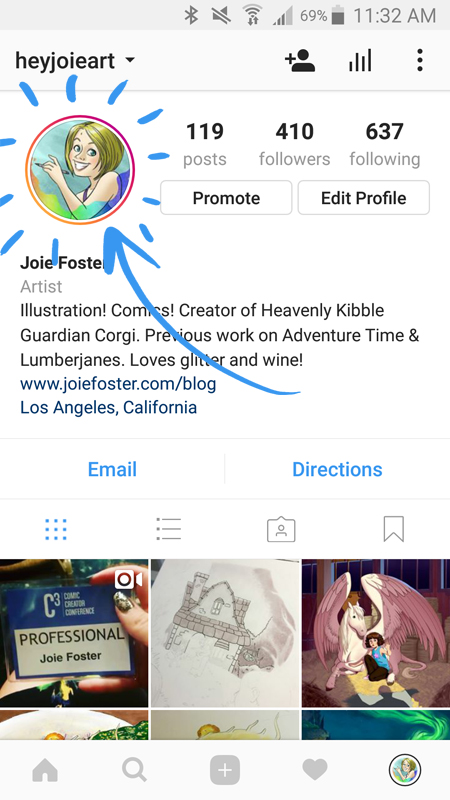
So if you're on board, head to your Instagram app and check the top of your feed! There's a horizontal row of profile pictures with a little sunset-gradient circle around them. Those are all the people you follow whose Stories you might be missing! Alternatively, you can go to my profile and click on my pic (as seen above).

Hope you enjoy, and maybe it'll inspire you to try it for yourself, too! See ya there.
The Making of "Spotted!"

Please raise your hand if in your childhood you wished to discover and care for a secret magical creature of your own? *both of own hands in the air* Now keep your hand up if you wish for the same thing as an adult? No? Only me? C'mon there's gotta be at least some of you...

Did enough iterations to just about animate the pegasus' wings flapping!

Did enough iterations to just about animate the pegasus' wings flapping!

I painted this about two months ago as an assignment Just For Myself (TM). Getting to work 100% for yourself is simultaneously exhilarating and terrifying. You can paint whatever you want! Also, you can... paint whatever you want... and you could easily get trapped because that gives you zero parameters and you'll self destruct in a never ending cycle of indecision.

Finally ended up on this-- a cover image for a faux middle grade novel I invented: a girl finds an injured pegasus and has to nurse it back to health. Unfortunately for her, she lives in the modern world which has no magic, so she has to go to extreme efforts to keep the thing hidden. Fun right? Definitely a story I would've gobbled up as a kid. And also now.

The colors, Duke! THE COLORS

The colors, Duke! THE COLORS

So since this was Just For Myself (TM) and I had no deadline, I spent lots of extra time in the planning stages. As you can see, I did 9 different thumbnails to figure out my composition, but that does not count the other 20 or so I did to figure out what scene from my fake story I even wanted to show!  If you're imaginative, you can almost follow along with my thought process:

Okay so they're in a barn together, and I want to show them getting spotted because WHOA that's drama! Ok so first let's see them in a horse stall and see a shadowy figure at the barn's opening. Hmm, ok should the pegasus' wings be unfurled or hidden under a blanket? Hidden under a blanket might make storytelling hard because people won't know it's a pegasus. Unfurled sort of cuts the whole picture in half, especially with those beams in the middle... hmm ok let's take 'em out, switch 'em around... trying adding in foreground elements. Nope ok, none of this is working, let's try a different angle. What if we're looking at them from close to where the shadow figure is standing? Ok we're back to the wing thing again...

After I'd nailed down what composition I wanted, I did 7 more thumbnails for values, half of which required a more refined drawing. I wanted to try out different dramatic lighting schemes to see what told the story the best way. I also tried a tilted angle (sometimes known as Dutch Angle), but decided it looked like a slasher movie. Scree! Scree! Scree!

The final "rough"

The final "rough"

Then I went through 6 different color schemes before settling on my final "rough." I was ready to go! Well, except not really. I wanted to make sure the perspective on this piece was perfect. Yes, I COULD have done it by hand... but ain't nobody got time for that. So I busted out my ol' copy of SketchUp to model the interior of the barn. Once the model was done, I was able to finally do my pencil sketch on top of the entire thing to get it moving!

Hay Girl Hay! Since they're in a barn! I don't apologize for my puns. Pencils stage.

Hay Girl Hay! Since they're in a barn! I don't apologize for my puns. Pencils stage.

It's at this point that I'd like to point out that I had a TON of help and feedback from what I call my Circle of Trust (thank you Oatley Academy for coining that phrase)! It's important to get outside feedback from trusted artist friends about how a piece is going... especially when there's no client. I showed every single step of my process to my Circle, because I wanted this piece to be the best it could be! Think of it as using sandpaper; outside opinions and fresh, well-trained eyes are necessary to smooth a piece out.

To my Circle: You know who you are since I was emailing you about 20x a week. Thank you! <3

"Inks" is a weird term when the whole process is digital. Just think of it is as "smoother, nicer" pencils?

"Inks" is a weird term when the whole process is digital. Just think of it is as "smoother, nicer" pencils?

So once I'd gone through all that, I inked the piece. I ended up electing not to ink the hay, as I wanted to achieve the texture through painting. I kept the figures on a different layer than the background, as later I knew I intended to do what's called a "color hold" aka colorizing the lines. You seen any 90s Disney movies? Then you know what I mean.

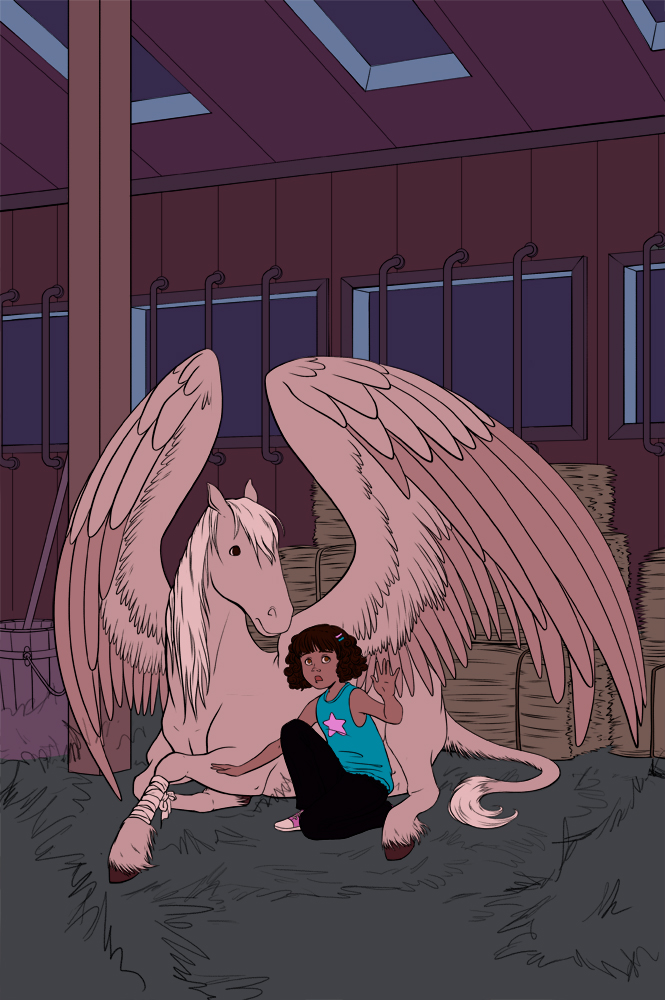
"Nighttime" flat colors

"Nighttime" flat colors

With this particular piece, I ended up using an approach that was a hybrid of how I do both comics and painting. I flatted the painting, which means I separated out all of the local colors of every object so I could render them later. When choosing my flat colors, I went with what everything would look like in the dark, and then paint in the light afterward!

Rough lighting pass

Rough lighting pass

Which is what this shot is here. You can see that the flat nighttime colors inform the shadows, but the "lights" make those colors make sense. Here I'd started rendering, the hay is starting to take shape... and you'll note that all the lines are still black. Don't worry, you'll see the color held lines in the final piece!

It's finished! Whoopie!

It's finished! Whoopie!

So about 10 hours of rendering, tweaking, and 20 zillion more rounds of feedback, I arrived at the finished piece! You can see that the lines are no longer black-- it's subtle, but the color held makes the drawing of the figures less harsh against the more painterly background.

Also a little birdie told me that people enjoy seeing animated GIFs of a painting's progress (I've only done it once before), so here you go! Hope you enjoy it. If you like it, I'll try to make them more often!

The process with more in between steps added!

The process with more in between steps added!

Do you like it when I make "client-free" work? Do you like pegasuses? Pegasi? (Whatever the word is). Do you like process posts and animated GIFs? (Pronounced like GIF, not JIF, this isn't peanut butter thankyouverymuch). Feel free to leave a comment and tell me your opinion! It's the internet, sharing opinions is everyone's favorite thing. Don't be shy, I'll respond!

"Atlantis" Process

Who doesn’t like dolphins? As a kid, I was obsessed with Ecco the Dolphin. I played all three Genesis games in the series, the Dreamcast version, and even got into a fierce bidding war on Ebay for the original soundtrack. I once spent about five hours randomly punching letters into the passcode level select stage so that I could get past really difficult levels. Would you believe that over a year, I actually managed to hit enough combinations that I got every level in the game? I mean I finished the game the normal way as well… but yeah. I was obsesssed.

Dolphin guards don't play around

Dolphin guards don't play around

Many a dolphin drawing and Ecco fanfic came out of my overly excited, young self. My favorite book was A Circle in the Sea by Steve Senn, which is fins-down the best dolphin fiction I’ve ever read. I even wanted to be a dolphin when I grew up– the major hang up was that I’m not a very good swimmer, so there went that dream. Whoops.

Initial sketch ideas

Initial sketch ideas

So now that I’m a “grown-up” (sorta) I thought I’d use the 23 years of practice I have on my 6 year old self to make a cool dolphin environmental painting. One day on my lunch hour I started doing thumbnails and concept sketches to decide what I wanted to do. I decided I wanted to tell my head-canon version of the Lost City of Atlantis– a city that was built by undersea creatures as a refuge from humans. The idea is that humans were never involved in Atlantis and certainly aren’t welcome there. We, the viewer, have discovered it… but a dolphin guard isn’t happy that we’re here.

Rough drawing

Rough drawing

I wanted to design what a dolphin sentinel that protected the city would look like. If a dolphin wore armor, how would it work? Obviously it would need to be articulated to move properly with the way that dolphins swim. It would need to function as both armor and a weapon, without encumbering the animal too much. I decided that lightweight armor would serve a dolphin best, as they would likely be a type of soldier/guard that relied on speed and agility.

Color exploration

Color exploration

The sort of armor I came up with is relatively minimalist. It protects the animals back, head, and blowhole. The front is bent upward so that the dolphin’s echolocation is uninhibited. It has razor edges, so that the dolphin could sail by an enemy and cause damage without having to manipulate anything. The big weapon though, is the narwhal-inspired horn in the front. It’s a magical element, so not only is it useful for stabbing, but it magically makes the armor lighter overall.

Detail of this pissed dude

Detail of this pissed dude

The city itself has a lot of round shapes. If you’ve read the aforementioned A Circle in the Sea, you’ll know that in Senn’s world, everything is circular to a dolphin. The sun and moon run on a circular path, the tides and currents are circular, a pod is called a “Circle”, and… well, y’know, the Circle of Life. So I wanted a lot of circles and curves in my Atlantis because that book made such a HUGE impact on my young mind.

Shiny, shiny lights

Shiny, shiny lights

The painting itself took six months from inception to finish. Why? Not because it actually took me that long to plan and paint. I’d say that only took maybe 15 hours or so. It’s because I did all the concept art and planning and then straight up forgot about it! Err… oops. That’s ok though, because I just finished up an Environmental Painting class over at Studio Arts taught by super cool dude Alex Ruiz, and the stuff I learned in that class really helped me bring this painting to the level I wanted it to be!

a super sweet animated GIF I made of the painting’s progress. Watch it and say, “Ooooooo, technology!”

a super sweet animated GIF I made of the painting’s progress. Watch it and say, “Ooooooo, technology!”